Saturday, April 30, 2016

Easy Shape And Clipping mask Creating Tutorials


cutting shapes tutorial step 3 image


shapes and clipping masks

shapes and clipping masks
For this tutorial, i will be able to be victimization Photoshop CS5. we'll initial learn 1) the way to produce Shapes, and at the moment, 2) I’ll offer ideas on the way to use those shapes as clipping masks. begin by starting along with your page. you'll be able to begin with a a brand new 12×12 document or begin along with your background paper.

SELECTING A SHAPE:

Step One:
1. choose the Custom form Tool
2. If choosing Custom Shape: select the form you would like to use
3. If choosing Rounded parallelogram tool: Set the Radius
4. check that form Layers tab is chosen.
shapes and clipping masks

DRAWING OUR SHAPE:

Step Two:
1. once your form is selected:
2. Right click on your canvas and Pull Down till you reach the specified size.
**TIP*** If you would like your form to take care of excellent proportion (same breadth and height),
be sure to carry the shift key down as you drag.
USING OUR SHAPES AS CLIPPING MASKS:

Now you may marvel what precisely will we have a tendency to do with these black shapes that we've simply drawn. this is often wherever “clipping” comes in… and also the prospects endless! we are able to take ANY of those shapes and clip things to them. we are able to clip papers, photos… there square measure such a big amount of ways in which you'll use a Clipping Mask. By victimisation the Shapes Tool, you'll even build your own example to create your layout. this is often precisely my scrapbooking process… Let Maine make a case for however.
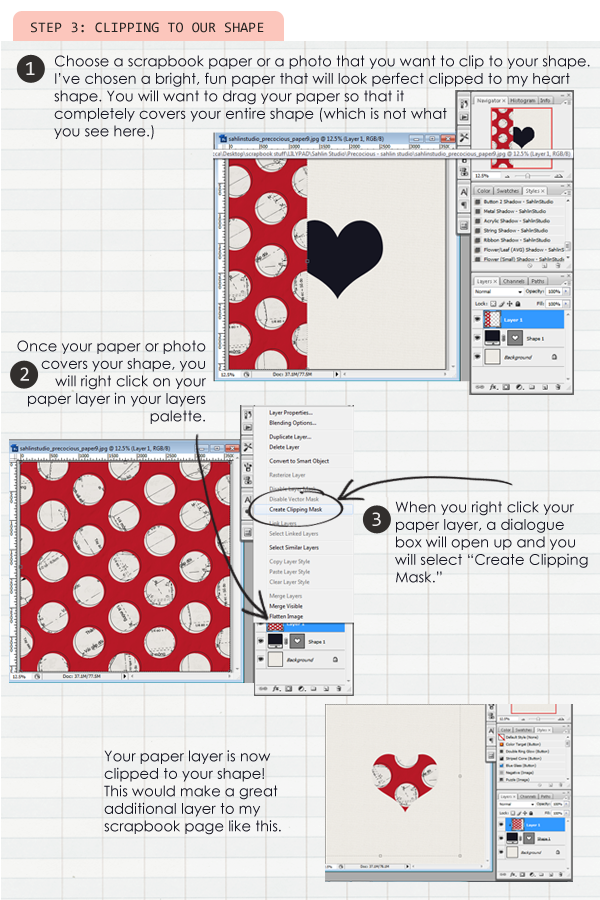
Step Three:
1.Drag a paper or image layer on prime of your form layer, ensuring it utterly covers the form.
2. Right click your paper layer in your layers palette
3. choose produce Clipping Mask

What to try to to when You’ve Clipped:
shapes and clipping masks
There very area unit numerous things that you just will do with the shapes and clipping tools.
And I hope when reading this, several of you've got had associate “Ah hah” moment today!

Labels: , , , , , , , ,

Friday, April 29, 2016

One Of The Best Tutorial For Easy Clipping Path

Want to induce obviate the background of associate degree image? need a new well-favored background except for the initial one? or simply need mere change of color your aspired image? Clipping path is that the smartest tool of this sort of image manipulation design.

Clipping path or Silhouette/silo is that the method of operation the initial background of a picture and inserting it infallibly into a replacement image or background. All the contents within the trail are going to be gift when the clipping path is applied et al outside the trail are going to be absent from the output. Pen tool is that the best thanks to perform photoshop clipping path. It’s a manual task and fast and simple thanks to accomplish an honest cui out.

In this tutorial i will be able to discuss the best however inventive ways that to try to to a clipping path. return and luxuriate in it!

Step 1

Open up a picture in Photoshop that you simply need to try to to clipping path.

Clipping Path
Take the pen tool from the tool box or just press ‘p’.

Clipping Path


Step 2

With pen tool begin drawing the trail space on your image you wish to use clipping path.
Clipping Path
Step 3

After drawing the trail on the border of your image it’s time to pick out to chop it get into afresh background. Click the ways tab on the Layers palette. A grayscale path can appear name work path. simply click on that with mouse and pressing Ctrl key at the same time. The image path are going to be elite.

Clipping Path

Step 4

You can clip the image and take away the background in 2 ways that currently. go into the choose possibility at the highest middle so hit inverse. currently delete the background by pressing the ctrl key + choose the trail layer and press delete.

Clipping Path

Or, you'll merely copy the choice space of the image and make a replacement document so click paste. it'll offer you a different background of your image.

Step 5

Clipping Path

Fill the background color or something you wish as your background within the white background.

Great! You finished fooling around clipping path.

Labels: , , , , , , ,

Thursday, April 28, 2016

Background Removing Or Clipping Path Tutorial

Graphics Icon shows here the manual clipping path tutorial for the best delicate quality of the Image though there are various types of process in Photoshop like Quick selection tool, Magic Wand tool, Alpha Channel Masks to removing Background when people face the following questions.

1. Best way to remove the main object's background in Photoshop ?
2. How to clip object to remove the background in Photoshop CS's ?
3. How to remove the main object's background in Photoshop in the best way ?
4. How to remove a Background of an Image in Photoshop CS's ?
5. How to change background with pen tool in Photoshop ?
6. Easy way to remove the Background in Photoshop CS's?

       Image before removing Background:
Clipping Path

            Image after removing Background:
 Clipping Path
Best way to do Clipping Path or Background Removing
Follow the instructions:

1. In Photoshop, open an image you want to use for your clipping path or Background Removing

tutorial (go to the file menu in Photoshop, then select open, from the open dialogue box choose the file you want to use and then click open.

Clipping Path

2. When you have got the file open in Photoshop, select the "Pen Tool" from the tool box (if you can't see the tool box, go to window menu and select "Tools"). Now, make sure that you have selected "Paths" from the pen tool menu bar which is located underneath of the main Menu bar.

Clipping Path

3. Now you can zoom the image for the best quality as you like but I think zoom level from 300 to 400 is preferable. Then, click on the image edge and drag the mouse pointer towards the next step and release the mouse. After an appropriate distance, again click on the image edge and continue in the same manner until you have completed moving around the image and finally see this "O" symbol in the last circle anchor  point. This "O" symbol means you are going to close the path. Click on it (starting point) in order to close the path.

Clipping Path


4. Hence, this same procedure will be continued if you find multiple objects in the Image. Clip all products one by one.

Clipping Path

5. Once the path is completed around the image and it is closed properly, go to path palette (window menu/ select "Paths"). Double click on the "work path"
Clipping Path


6. And then, press enter to save the path and the path name will be changed to "Path-1" instead of "work path".

Clipping Path

7.Go to "pop up" menu from the Paths palette. And "Click" the red circle area.

Clipping Path


8.  Then, select "Clipping Path...". A dialogue box will appear asking to choose your desired path and Flatness.

Make Clipping Path

9. Next, Select the path you want to Clipped and Put the flatness you desire and click "OK". You are now almost done. Flatness is the desired amount of pixel you want to make blur the image edge. The more amount you use in Flatness the more image edge will be blurish. In general, leave the Flatness box blank (0) and the image edge will be 100% sharp which is most of the time appropriate.

Clipping Path

10.
Clipping Path

Finally, you can now save the file in your file format you need like JPEG,TIFF, PSD or any format and now ready to place into the program you are working with for your design. This time you will get the image without the background. That's all about Clipping Path or Background Removing.

Labels: , , , , , ,

Wednesday, April 27, 2016

How To Create Clipping Path Easy

1. What is Clipping Path

2. Where to utilize Clipping Path

3. Step by step instructions to do Clipping Path

What is Clipping Path?

A Path is a shut vector way or shape, used to remove a picture in current picture altering programming like Adobe Photoshop. Once the way is made, cutting way is then connected on it so that anything outside the way will be precluded when you put the document into Illustrator, InDesign or any web creating programming and inside the way will stay same as some time recently.

Where to utilize Clipping Path?

Cutting Path is important when we utilize any photograph/photo/picture to set up a configuration, for example, handout plan, magazine outline, web outline, pamphlet and some more. For instance, I have a photo with foundation shading dim and should be utilized as a part of the front page of my list. I should expel the foundation of that specific picture subsequent to my Catalog shading is green and have some other outline. To do as such, I should make way around the picture and after that change over it into section way. And after that, when I utilize it in Illustrator, InDesign, Dreamweaver or some other system, the picture foundation will vanish, mean no foundation (straightforward). It will indicate just the picture which was inside the way. Take a gander at the pictures beneath to get a live


Before Clipping Path
After Clipping Path
How To Clipping Path ?
1. Open an image in Photoshop you want to use for your clipping path tutorial (go to the file menu in Photoshop and select open, from the open dialogue box choose the file you want to use and then click open.

Photoshop pen tool   Photoshop Pen Tool
Pen tool menu

2. Once you have got the file open in Photoshop, select the “Pen Tool” from the tool box (if you can’t see the tool box, go to window menu and select “Tools”). Now, make sure that you have selected “Paths” from the pen tool menu bar which is located underneath of the main Menu bar.

3. Now click on the image edge and drag the mouse pointer towards the next step and release the mouse. After an appropriate distance, again click on the image edge and continue in the same manner until you have completed moving around the image and finally see this “o” symbol. This “O” symbol means you are going to close the path. Click on it (starting point) in order to close the path.
Before Clipping Path
After Clipping Path

4. Once the path is completed around the image and its closed properly, go to path pallete (window menu/ select “Paths”). Double click on the “work path” and press enter to save the path and the path name will be changed to “Path-1” instead of “work path”.

Photoshop work path
Photoshop Work Path
Path palette popup
Path Palette Popup

5. Go to “pop up” menu from the Paths palette and select “Clipping Path…”. A dialogue box will appeare asking to choose your desired path and Flatness. Select the path you want to Clipped and Put the flatness you desire and click “OK”. You are now almost done. Flatness is the desired amount of pixel you want to make blur the image edge. The more amount you use in Flatness the more image edge will be blurish. In general, leave the Flatness box blank (0) and the image edge will be 100% sharp which is most of the time appropriate.

Path palette popup menu
Path Palette Popup

Applying clipping path
Applying Clipping path

6. You can now save the file in PSD or TIFF format and ready to place into the program you are working with for your design. This time you will get the image without the background. Thats all about clipping path.


Labels: , , , , ,